In a previous post, we (@Sw4mp_f0x and I) discussed the importance of data parsing skills for penetration testers and detailed the basics of how to get started with it. We covered a few tools, but only scraped the surface of what’s possible with two very powerful tools: awk and sed. As a refresher, AWK is a programming language for pattern scanning and processing. You run AWK commands with the awk tool. sed is a stream editor tool that is primarily used to restructure input by performing pattern substitutions. In this post, we will be covering more advanced uses for awk and sed to further refine your parsing skills and efficiency.
Advanced awk Usage
In our previous post, we covered how awk can perform pattern searching and return specific fields from the output. This is only a small fraction of what awk can do.
Field Matching
Building granular and specific search patterns can become critical when dealing with complex text files. In addition to matching strings and regular expressions on entire lines, awk can limit searches to certain fields.
Look at these lines from an Apache access log:
127.0.0.1 - - [03/Oct/2016:22:32:05 -0700] "GET /200_ways_to_be_1337.html HTTP/1.1" 404 514 "-" "Mozilla/5.0 (X11; Linux x86_64; rv:38.0) Gecko/20100101 Firefox/38.0 Iceweasel/38.8.0"
127.0.0.1 - - [03/Oct/2016:22:32:08 -0700] "GET / HTTP/1.1" 200 3416 "-" "Mozilla/5.0 (X11; Linux x86_64; rv:38.0) Gecko/20100101 Firefox/38.0 Iceweasel/38.8.0"
If we wanted to output a list of invalid URIs being requested from the server, matching on 200 or 404 alone will yield a number of false positives. Instead, if we tell awk to search only the 9th field for 404, we will only pull out the URIs for resources that were not found by the server. Here’s the syntax:
awk ‘$9 ~ /404/ { print }’ access.log
You can also do a negative match with the ! regular expression metacharacter placed before the tilde.
Logical Operators
Like other scripting languages, awk supports logical operators, including:
&&- and||- or!- not
These operators follow the standard order of operations of AND being evaluated before OR; however, awk supports overriding precedence with parentheses.
The following commands would all output True:
awk ‘1 == 1 && 2 == 2 { print “True” }’ test.txt
awk ‘1 == 1 || 2 == 3 { print “True” }’ test.txt
awk ‘1 == 1 && 2 == 2 || 2 == 3 { print “True” }’ test.txt
awk ‘1 == 1 && (2 == 2 || 2 == 3) { print “True” }’ test.txt
To follow the previous section’s example, we could match only on server HTTP 200 status responses to GET requests:
awk '$9 ~ /200/ && $6 ~ /GET/ { print }' access.log
Conditionals
Conditionals perform actions if certain states are true or false when the script is run. In awk we express that as follows:
awk '{if (myvar == "True") {print "True"; myvar = “False”} else {print "False"; myvar = "True" }}' file.txt
In the command above, awk will iterate through each line alternating printing True and False. It accomplishes this by defining a variable (myvar) and checking for the current value of the variable. If it’s “True,” it will print “True” and flip the value to False (and vice-versa). This processing is performed once for each line in file.txt. If you have multiple actions in either the if or else block, you must use curly braces. Otherwise, you can separate the parts of the command with a semicolon. else blocks are optional and may be omitted. awk also supports else if conditional expressions, following the same rules as else.
BEGIN/END Blocks
BEGIN and END blocks are processed before and after awk processes input records. They are typically used to change awk system variables, prepend or append records to output, or initialize variables the script will use. A key distinction between defining variables in the BEGIN block vs in the normal command is that the BEGIN block is processed before any input lines have been read by the script. Depending on what your code is doing, that may have a significant impact on the accuracy of your script.
Here is the syntax for using both blocks:
awk ‘BEGIN { CODE } /SEARCH/{ print STATEMENT } END { CODE }’ file.txt
Here’s an exaggerated example parsing a gnmap file, for illustration’s sake:
awk ‘BEGIN { ORS = ”\n\n”; print “Open ports found:”} /\/open/{print $5 portcount++} END {print “Parsing done. ” portcount “ ports found.”}’ portscan.gnmap
Output:
Open ports found:

80/open/tcp//http//Apache0

22/open/tcp//ssh//OpenSSH1

80/open/tcp//http//Apache2

80/open/tcp//http//Apache3

Parsing done. 4 ports found.
Notice that there is an additional line break (\n) between each record, thanks to the ORS variable.
Loops
Awk supports three types of loops: for, while, and do-while. Loops in awk act similarly to loops in most other programming languages. Each loop type has its own usefulness, depending on your requirements.
For
The syntax for a for loop is as follows:
for (initialization; condition; increment)
	{actions}
For loops are useful when you need to perform an action (or actions) a defined number of times. Such as:
awk 'BEGIN {
for (x=0; x <= 255; x++)
{print "192.168.1."x}
}'
This example uses a BEGIN block (covered later in this post) to execute the awk commands without needing to act on a file.
While
While loops will run until a specified condition is no longer true. The syntax for while loops is:
while (condition)
	{actions}
While loops are useful when the number of times to iterate is unknown or based on a condition, rather than a count.
To rework the example from above:
awk 'BEGIN {
x = 0
while (x <= 255)
{print "192.168.1."x
x++}
}'
Do-While
The do-while loop is very similar to a while loop, except that the condition is placed at the end of the syntax:
do
	{actions}
while (condition)
This means that if the condition is false on the first run, the actions are still executed once. In a normal while loop, the condition is checked prior to running actions, meaning if the condition was false on the first iteration, nothing would happen.
Break, Continue, Exit
Loops have three additional keywords worth knowing: break, continue, and exit.
Break is used to escape the innermost loop currently executing and continue executing awk. For example, if you wanted to run a certain action in a while loop and stop when a second condition (not defined in the while (condition) code) is met, you could use if to test for that second condition and run break when the it is met.
Continue is used to skip over remaining code in the current iteration. This is useful if you want to avoid certain processing only when certain conditions are met.
Exit not only breaks the current iteration or loop, but completely stops the awk execution. It should be used only when a certain condition terminates the need to continue processing, such as an error.
Arrays
Arrays in awk work similar to dictionaries in Python. You can store data in the index and value of the array. Values are referenced with the corresponding index, like so:
array[index]
To demonstrate the syntax, here’s an example that parses a simulated phishing email click log for how many times each user clicked.
Given the following log:
User bill clicked one time.
User ted clicked one time.
User james clicked one time.
User bill clicked one time.
User bill clicked one time.
User henry clicked one time.
User socrates clicked one time.
User james clicked one time.
User bill clicked one time.
User andy clicked one time.
Run the following command:
awk '{name[$2]++} END{for (each in name) {print each " clicked " name[each] " time(s)"}}' phishlog.txt
Output:

awk Array Example Output
To delete an item from the array, use the following syntax:
delete array[index]
As you can see, awk’s array support gives us the ability to easily build counts of unique pieces of information repeated throughout the script. For more practical examples of array usage, check out the post AWK Arrays Explained with 5 Practical Examples by Ramesh Natarajan.
System Variables
Awk has a number of built-in system variables that can be modified to change awk’s default behavior or return useful information about the files being parsed. These variables are typically configured using the BEGIN block of the command, which are described in the next section, but can be accessed or modified at any point during a script’s execution.
Here are some of the most-used variables:
- FS - field separator (default: space(s) or tabs)
- RS - record separator (default: newline)
- NF - number of fields in the record
- NR - number of the current record
- OFS - output field separator
- ORS - output record separator
It’s important to note the differences between the FS/RS and OFS/ORS variables. FS/RS change how awk processes files (i.e. by default each field is space/tab-separated and each record is a newline), while OFS/ORS changes how awk outputs the results (i.e. after each field/record, insert a newline). The FS/RS variables allow you to perform multiline matching, covered in the next section, whereas OFS/ORS allow you to format the resulting output in a custom manner.
There are many more system variables. See the Predefined Variables section of the GNU Awk User’s Guide for more info.
Multiline Matching
By default, awk evaluates each input line as a separate record. By modifying the RS system variable, we can configure awk to treat multiple lines as a single record.
awk 'BEGIN {FS="\n"; RS=""} {print $1}' textfile.txt
In the sample syntax above, awk will treat each line as a separate field (as opposed to the default space/tab-separated field) and will consider a blank line the record separator. The field and record separator variables can be set to any single character, including special characters like \n and \t.
To demonstrate practical multiline matching, we’ll parse a .nmap file and print out the number of open ports on each host. Given the following .nmap file:
Nmap scan report for 192.168.1.14
Host is up.
PORT     STATE    SERVICE
80/tcp   open     http
443/tcp  open     https
8080/tcp open     http-proxy
8081/tcp filtered blackice-icecap
8443/tcp filtered https-alt

Nmap scan report for 192.168.1.193
Host is up.
PORT     STATE    SERVICE
80/tcp   open 	http
443/tcp  filtered https
8080/tcp filtered http-proxy
8081/tcp open     blackice-icecap
8443/tcp filtered https-alt

Nmap scan report for 192.168.1.55
Host is up.
PORT     STATE    SERVICE
80/tcp   closed   http
443/tcp  closed	https
Run the following command:
awk 'BEGIN{RS=""; FS="\n"} {split($1,a," "); host[a[5]] = 0; for (i=1; i<=NF; i++) if (match($i,"open") != 0) host[a[5]]++} END{for (each in host) print each " - " host[each]}' scan.nmap
And here’s the result:

awk Multiline Matching Example Output
This example sets the Record Separator to a blank line with “” and sets the Field Separator to the newline special character (\n) in the BEGIN block, which is run before awk parses the file. Next, awk will split the first field (line) of each record and add an entry for the IP (the fifth item in the split array of a) with the value of zero. Awk then iterates through the remaining fields (NF is the number of total fields) and attempts to find the string “open” in each field. If the string is present, and the port is open, it will increment the count for the IP in the host array. In the END block, awk prints each host and the number of total open ports for that host.
Script File
We’ve already seen how awk can match one search pattern, but what if we want to apply multiple rulesets to the same input file? awk can chain multiple search patterns and print commands together in script format. The file is called with the -f flag:
awk -f myscript.awk inputfile.txt
To illustrate this concept, we’ll look at parsing an Apache log. Suppose we wanted to return the URI for all successful web requests and source IPs from all invalid requests. We also want to output a unique list of entries for each request type (successes and failures), rather than outputting data as we parse the log.
Source access.log file:
192.168.55.6 - - [03/Oct/2016:22:05:26 -0700] "GET / HTTP/1.1" 200 3417 "-" "Mozilla/5.0 (X11; Linux x86_64; rv:38.0) Gecko/20100101 Firefox/38.0 Iceweasel/38.8.0"
192.168.55.6 - - [03/Oct/2016:22:05:27 -0700] "GET /favicon.ico HTTP/1.1" 404 505 "http://192.168.55.224/" "Mozilla/5.0 (X11; Linux x86_64; rv:38.0) Gecko/20100101 Firefox/38.0 Iceweasel/38.8.0"
192.168.102.4 - - [03/Oct/2016:22:05:29 -0700] "GET / HTTP/1.1" 200 3416 "-" "Mozilla/5.0 (X11; Linux x86_64; rv:38.0) Gecko/20100101 Firefox/38.0 Iceweasel/38.8.0"
192.168.200.2 - - [03/Oct/2016:22:05:31 -0700] "GET / HTTP/1.1" 200 3416 "-" "Mozilla/5.0 (X11; Linux x86_64; rv:38.0) Gecko/20100101 Firefox/38.0 Iceweasel/38.8.0"
192.168.200.2 - - [03/Oct/2016:22:05:31 -0700] "GET /icons/openlogo-75.png HTTP/1.1" 304 181 "http://192.168.55.224/" "Mozilla/5.0 (X11; Linux x86_64; rv:38.0) Gecko/20100101 Firefox/38.0 Iceweasel/38.8.0"
10.1.20.34 - - [03/Oct/2016:22:05:34 -0700] "GET /admin HTTP/1.1" 404 499 "-" "Mozilla/5.0 (X11; Linux x86_64; rv:38.0) Gecko/20100101 Firefox/38.0 Iceweasel/38.8.0"
10.1.20.34 - - [03/Oct/2016:22:05:38 -0700] "GET /login HTTP/1.1" 404 499 "-" "Mozilla/5.0 (X11; Linux x86_64; rv:38.0) Gecko/20100101 Firefox/38.0 Iceweasel/38.8.0"
192.168.55.1 - - [03/Oct/2016:22:05:48 -0700] "GET /uberleet.html HTTP/1.1" 200 281 "-" "Mozilla/5.0 (X11; Linux x86_64; rv:38.0) Gecko/20100101 Firefox/38.0 Iceweasel/38.8.0"
192.168.55.1 - - [03/Oct/2016:22:31:12 -0700] "GET /200_ways_to_be_1337.html HTTP/1.1" 404 519 "-" "Mozilla/5.0 (X11; Linux x86_64; rv:38.0) Gecko/20100101 Firefox/38.0 Iceweasel/38.8.0"
127.0.0.1 - - [03/Oct/2016:22:32:05 -0700] "GET /200_ways_to_be_1337.html HTTP/1.1" 404 514 "-" "Mozilla/5.0 (X11; Linux x86_64; rv:38.0) Gecko/20100101 Firefox/38.0 Iceweasel/38.8.0"
127.0.0.1 - - [03/Oct/2016:22:32:06 -0700] "GET /favicon.ico HTTP/1.1" 404 500 "-" "Mozilla/5.0 (X11; Linux x86_64; rv:38.0) Gecko/20100101 Firefox/38.0 Iceweasel/38.8.0"
127.0.0.1 - - [03/Oct/2016:22:32:06 -0700] "GET /favicon.ico HTTP/1.1" 404 500 "-" "Mozilla/5.0 (X11; Linux x86_64; rv:38.0) Gecko/20100101 Firefox/38.0 Iceweasel/38.8.0"
127.0.0.1 - - [03/Oct/2016:22:32:08 -0700] "GET / HTTP/1.1" 200 3416 "-" "Mozilla/5.0 (X11; Linux x86_64; rv:38.0) Gecko/20100101 Firefox/38.0 Iceweasel/38.8.0"
Place the following ruleset into access_log_parse.awk:
$9 ~ /200/ {success[$7]++}
$9 !~ /200/ {failure[$1]++}
END {
	print "Successes:"
	for (x in success){
		print x " - " success[x]
	}
	print " "
	print "Failures: "
	for (y in failure){
		print y " - " failure[y]
	}
}
Running the script:
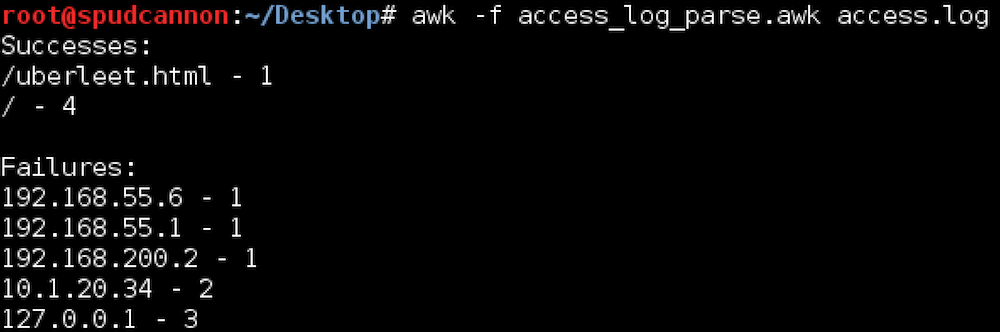
awk Script File Example Output
Advanced sed Usage
As explained in our previous post, sed is a powerful stream editing tool by manipulating standard input and output. Typical sed usage consists of receiving stdout and performing substitution, and rightly so, but it also has some powerful pattern matching functionality similar to awk. In sed you can specify an address to execute commands at, such as substitution. Addresses can be either line numbers or patterns.
Line addressing
With line addresses, you are specifying which line numbers you want to target. Here are some examples of what this looks like:
sed ‘1,2d’- Delete lines 1 through 2.sed -n ‘1~2p’- Print the first line and every 2nd line from that point (1, 3, 6, 9…). The ‘p’ flag tells sed to print those lines. The ‘-n’ switch needs to be used to suppress output so only the specified lines are printed.sed ‘$d’- Delete the last line. Outside of regex, $ means the last line.sed '2s/l/?/g'- Replace ‘l’ with ‘?’ on the second line. We are simply attaching a substitution command to a line number.
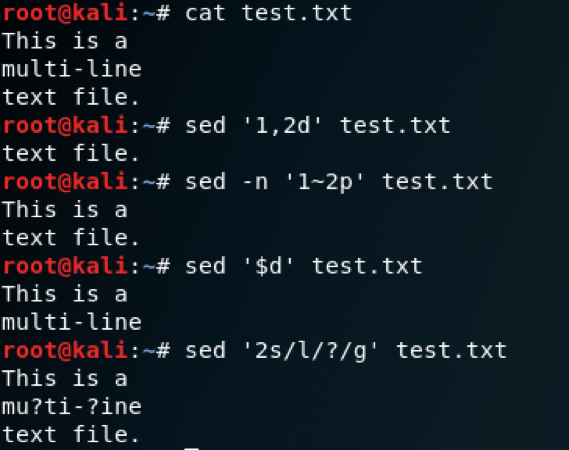
sed Line Addressing Demo
Pattern Addressing
Although awk is known for its pattern matching, sed has identical functionality. As I mentioned earlier, sed calls this an address, as in you are specifying an address at which you will execute a command or series of commands. Placing a pattern between forward slashes will place any line that matches into the pattern space for processing. Like awk, files and standard output are processed by sed one line at a time in a pattern space buffer. After a line is processed, the result is printed and the pattern space is replaced with the next line to be processed. There is also a second buffer called the hold space that can be used. To do a basic pattern match like awk, we print the line by appending a p flag. By default, sed will print the entire file. We will use the -n switch to suppress this behavior.
sed -n ‘/multi/p’ test.txt
Instead of printing the line, we can use pattern matching to specify lines to manipulate by appending a substitution command.
sed -n ‘/multi/s/-line/\ line/’ test.txt
Multiple expressions can be used in a single sed command by separating them with a semicolon or specifying each expression in a separate -e switch. Here we are using ampersand, which represents the pattern specified.
sed -n ‘/multi/s/-line/\ line/;s/text/&less/’ test.txt
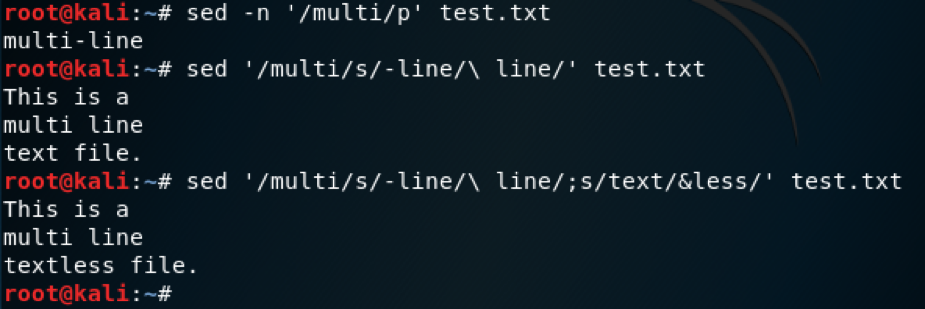
sed Pattern Addressing Demo
Referencing Matched Patterns
Much like awk, sed can reference matched patterns using parenthesis. With sed, these parenthesis must be escaped.
sed 's/\(text\) \(file\)/\2 \1/' test.txt

sed Referencing Matched Patterns Demo
Manipulating Newlines (‘\n’)
In order to use sed to manipulate newline characters, it is important to understand how sed handles output while looking for patterns. This presents a challenge if you want to include newlines (\n) in your regex pattern, because sed will never encounter them.
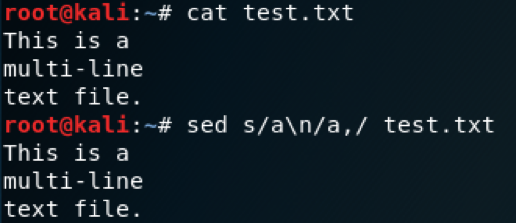
Showing \n Not Being Processed
In order to process newlines, you must use some more advanced sed features. When I originally encountered this constraint, I found this StackOverflow reply. In it, Zsolt Botykai demonstrates that this can be done with the following command:
sed ':a;N;$!ba;s/\n/, /g' test.txt
Let’s break down what this command is doing so we understand it enough to mold it to fit our needs. This is a series of sed commands separated by semicolons, or a sed script. Each of these commands can be referenced by your favorite sed cheat sheet. This is a good one. The individual commands are:
:a- Creates a label titled a. This is used as a sort of bookmark to call back to with flow control commands.N- Adds the next line to the pattern space, creating a multiline pattern space. In order to become a multiline pattern space, the newline character is included at the end of each line.$!ba- This command will return flow to the a label using the branch command (b) if the current line is NOT the last line ($ meaning ‘last line’ and ! meaning ‘not’). From left to right you can read this as “if not the last line, branch to label a”. The result with this three commands is that the entire file is put into the pattern space, along with all the newline characters.s/\n/,/g- Lastly, every newline character in the pattern space is replaced with a comma and space.
Using this one-liner, you can manipulate all of the newline characters in a document or stdout as you need.

sed Newline Processing Demo
Multiline Matching
Matching and manipulating multiple lines is fairly simple with sed. It is done by matching a line as the beginning of a multi-line section and then matching the final line. The lines that match are placed in the pattern space like an individual line normally would be. The syntax for this is:
sed ‘/start/,/end/’ test.txt
We could use this in a situation where we have an Nmap scan that includes hosts from an out-of-scope network, 192.168.2.0/24. We want to remove them, but the hosts are scattered throughout the file because we used the –randomize-hosts switch when scanning. For this scenario we will use the .nmap file that we used in the awk Multiline Matching, but will change the middle host to another 192.168.2.193:
Nmap scan report for 192.168.1.14
Host is up.
PORT     STATE    SERVICE
80/tcp   open     http
443/tcp  open     https
8080/tcp open     http-proxy
8081/tcp filtered blackice-icecap
8443/tcp filtered https-alt

Nmap scan report for 192.168.2.193
Host is up.
PORT     STATE    SERVICE
80/tcp   open     http
443/tcp  filtered https
8080/tcp filtered http-proxy
8081/tcp open     blackice-icecap
8443/tcp filtered https-alt

Nmap scan report for 192.168.1.55
Host is up.
PORT     STATE    SERVICE
80/tcp   closed   http
443/tcp  closed   https
In order to remove these out of scope hosts from our scan file, we will use the following command:
sed '/192\.168\.2/,/^$/d' scan.nmap
In this command, any line with ‘192.168.2’ in it will be the beginning of a range. The end of the range is the blank line between hosts, ‘/^$/’. We use the d flag to delete the entire range.
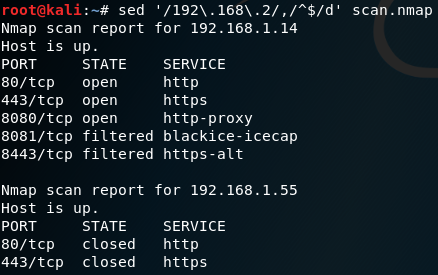
sed Multiline Matching Demo
Reference
Substitution Flags
- d - delete
- p - print line
- w [file] - output to a file
- n - The numbered instance of pattern match in the line to substitute
- g - Run substitution on all instances of pattern match. By default, only the first is substituted
Commands
- $ - Last line
- n - Read next line into pattern space
- N - Appends next line into the pattern space, creating a multi-line pattern space.
- :[name] - Create a label
- b[label] - Branch, or jump, to a label
- ! - Add to the end of an address to invert the match (i.e, match everything except this)
- h - Copy pattern space to hold space
- H - Append pattern space to hold space
- g - Copy hold space to pattern space
- G - Append hold space to pattern space
Miscellaneous
- & - References the text matched by the pattern
- \([regex]\) - Mark pattern for referencing
- \1, \2, \3… - Reference marked pattern
Summary
In this post we covered advanced awk and sed usage. We demonstrated some functionality the tools provide that often gets overlooked, but provides powerful options to rework text and get exactly the output you want. The next time you are faced with parsing a wall of text, consider using these tools rather than grinding through it manually.
References
Regular expressions, sed, and awk provide much more functionality that we’ve covered in these two posts. If you’d like to learn more, check out these resources:
- sed & awk (O’Reilly) - Dale Dougherty
- The GNU Awk User’s Guide
- List of sed one liners
- AWK Arrays Explained with 5 Practical Examples
- Learn Linux, 101: Text streams and filters
This post was co-written by Jeff Dimmock (@bluscreenofjeff) and Andrew Luke (@sw4mp_f0x).
Please check out Andrew Luke’s blog at https://pentestarmoury.com.