Parsing data is a fundamental ability that anyone serious about information security should consider putting time and effort into understanding. It can mean the difference between spamming Ctrl+F in a text editor and pulling out exactly what you need with a Bash one-liner that took a couple of minutes to create and modify. In the long run, the initial investment pays dividends for the rest of your infosec career.
In this post, and those that follow we will walk you through the tools and techniques we have used to find what we need when sifting through large amounts of data. This will be done using a Bash terminal from the perspective of a penetration tester, but the information translates to other infosec or IT ops situations. Much of this stems from a desire to automate and streamline the menial parts of our passion.
In this post we’ll be covering the basics of grep, cut, awk, and sed. In subsequent posts we will cover parsing with regular expressions (regexes), more advanced features of awk/sed, parsing XML with Python, and, finally, how to do everything above natively on Windows.
The Basics
Let us start by introducing the core tools and functionality that we will be using. Bash provides you with the ability to easily manipulate information output by parsing tools with basic programming logic and a pipeline. A great free resource to strengthen your foundational text manipulation skills is Ian Shields’s Learn Linux, 101: Text streams and filters, part of IBM’s DeveloperWorks library.
The Pipeline
Before we dive into the parsing tools, we need to cover the Bash pipeline. In short, the pipeline is a mechanism that allows tools to pass strings (text) to subsequent tools. To do this, use the pipe | character. For example, the following Bash command would concatenate the contents of EmailAddress.txt, using ‘cat’, and send that text to ‘sort -u’, which would remove duplicates in the text file output and organize it alphabetically:
cat EmailAddresses.txt | sort -u
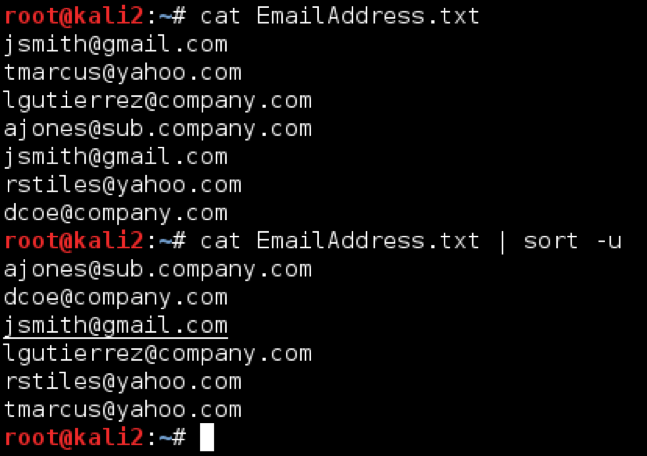
Using the Bash pipeline like this with the tools we below enables you to whittle down large amounts of data into a digestible, useful size and organize the data into a desired format.
xargs
Many programs accept command input from the pipeline, as shown above; however, some commands don’t work with pipeline on their own. In those situations, you may need to use xargs to process your text properly. Xargs converts the data stream into space-separated arguments for the specified command. For example, if we wanted to read all txt files in a directory:
find . -name \*.txt | xargs cat
Various Bash tools process their input and output differently, so you will need to play with xargs’s flags when creating your command for the first time, but it’s important to be aware of xargs.
grep
grep is probably one of the most well-known text processing tools. In the words of the man page authors, grep “searches input files for lines containing a match to a given pattern list.”
Here’s grep’s syntax:
grep [options] pattern <file>
The best way to introduce grep is through usage examples. The most common way to use grep is to print lines that contain a provided string or regex. An easy usage example that I use all the time on my testing box is searching for a specific process by name. If we’re looking for the PID of evilscript, we would run:
ps aux | grep evilscript

In this command, grep is searching each line of output for the exact string “evilscript” and echoing any lines with a match to standard output. This is an important distinction between grep and awk: on its own grep returns the entire line that contains a match. It requires other tools to parse the individual lines.
Here are some additional useful flags:
-i ignores casing
-v invert-match. Returns lines that do NOT match provided pattern(s)
-E extended regex. Interprets the pattern as a regular expression
-f
cut
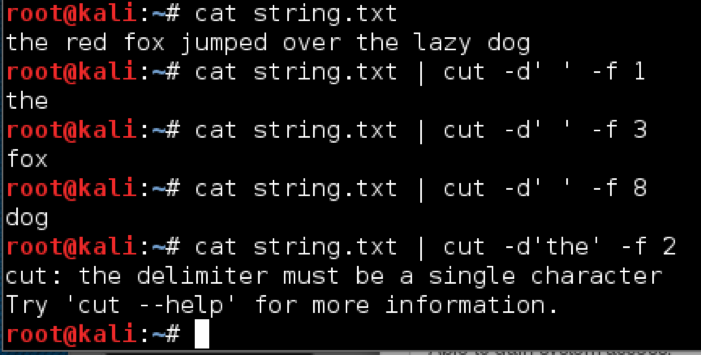
cut returns selected fields from each line of the pipeline or file. This is useful for honing data even further than what grep allows. The basic syntax is as follows:
cut -f<fields> [-d’<delimeter>’] [/path/to/input/file]
The -f flag is used to specify the field or fields you want returned. You can list multiple fields with commas or hyphens. For instance, -f1-3,5 will return the first, second, third, and fifth fields. Fields are delimited with a TAB by default; however, this can be changed with the optional -d flag. Notice there is no space between -d, the delimiter is wrapped in quotes, and only single characters can serve as field separators:
We can use cut to extract the process ID field from our earlier example.
ps aux | grep evilscript | cut -d’ ‘ -f 7

awk
AWK is a programming language for pattern scanning and processing. awk is a tool to run AWK scripts in Bash. The man page is long and there have been many books written about awk. awk can be intimidating and confusing at first, but stick with it- it’s very powerful and can serve pentesters well. With awk you set a pattern to match, similar to grep, and a series of processing rules to apply to the matched line.
The best way to learn awk’s syntax is by breaking down a few examples.
To return to our earlier example of getting the PID of the evilscript process running on our host, we would use:
ps aux | awk ‘/evilscript/’
This returns the entire line to us, just like grep. So why use awk? Let’s say we wanted to automate killing the evilscript process with our command. We wouldn’t be able to pipe the entire line to kill, we need to isolate the PID. grep and cut can accomplish this, but there are times when using both is two unwieldy due to other tools on the pipeline or just purely wanting to make thing easier. Additionally, awk provides much more advanced capabilities than grep piped to cut. In awk, we would use the following:
Let’s break down what’s going on:
Return only the text in the NUMBER field. By default, a field is separated by a space, but it can be specified with the -F flag.
awk treats sequential spaces as a single delimitation, whereas cut will treat each space as a delimitation. For example, with awk the PID is the second field. With cut, the PID field is not in a consistent position based on the length of the user field value and the PID field value. This leads to inconsistencies and bugs in your scripts one-liners.

If you want to use awk to process the contents of a file, you can do so by adding the file path to the end of the command, like this:
awk ‘/searchpattern/{print $1}’ /path/to/file
Though brief, this introduction to awk is enough information to get you manipulating data easily.
Full Disclosure: An easier way to find a PID by process name is pgrep, but for illustrative purposes we’re using other tools.
sed
sed is another massively useful stream editor tool. It’s useful for taking input, applying restructuring rules on said input, and outputting the results. Like awk, sed has so many options and functions it takes an entire book to give adequate coverage to them all. The most commonly used sed command is substitution.
Here’s the basic syntax for using sed’s substitution command:
echo hack the world | sed ‘s/world/planet/’
The substitution command (s) is followed by a forward slash delimiter, the text to replace, another forward slash delimiter, text to replace with, and a closing forward slash. Wrapping the command in single quotes is not always strictly necessary, but it can save a lot of headache escaping characters and is considered best practice.
Alternatively, if we had hacktheplanet.txt with the contents of hack the world, we could replace the text in the file with the following command:
sed -i ‘s/world/planet/’ HackThePlanet.txt

Note that on OS X, you will need to replace -i with -i ‘’ (two single quotes) for this to work.
By default, substitute will only replace the first pattern match per line. To replace all occurences, add the g option after the last forward slash delimited, like this:
sed ‘s/world/planet/g’
We will cover additional features offered by sed along with regular expressions in the next post in the series.
Choosing Which Tool to Use
With any skill, there is a generally held “way to do it,” and *nix text processing is no different. We subscribe to the mindset that during a test, if a tool accomplishes your goals then it’s not wrong. If I need to get a list of live hosts on a test, I’ll use the tool I’m most comfortable. You might be piping multiple instances of grep into each other, but not having to use references to build a complex command will get you results quickly- it doesn’t need to win any awards.
Examples
Building IP Range Lists
A client has provided you a list of “all known IP address ranges that exist in the environment,” which is littered with descriptions that may be inaccurate. You want to build a unique list of IP address ranges from that list to scan with nmap. For the sake of demonstration, we will use the following IP list:
--First Floor--
Computers: 192.168.1.0/24
WiFi APs: 192.168.2.0/24
Printers: 192.168.2.0/24
--Second Floor--
Computers: 192.168.3.0/24
WiFi APs: 192.168.4.0/24
Printers: 192.168.4.0/24
--Server Room--
Windows Servers: 192.168.100.0/24
Switches and Wireless LAN Controllers: 192.168.101.0/24
To tackle this, we want to filter out all of the descriptions and return a unique list of IP addresses. Luckily, the descriptions are separated from the IP address ranges using a colon, so we can cut on that delimiter.
The first method we can use would be to combine grep, cut, and sed
grep 192. Client-IPs.txt | cut -d: -f2 | sed ‘s/ //’
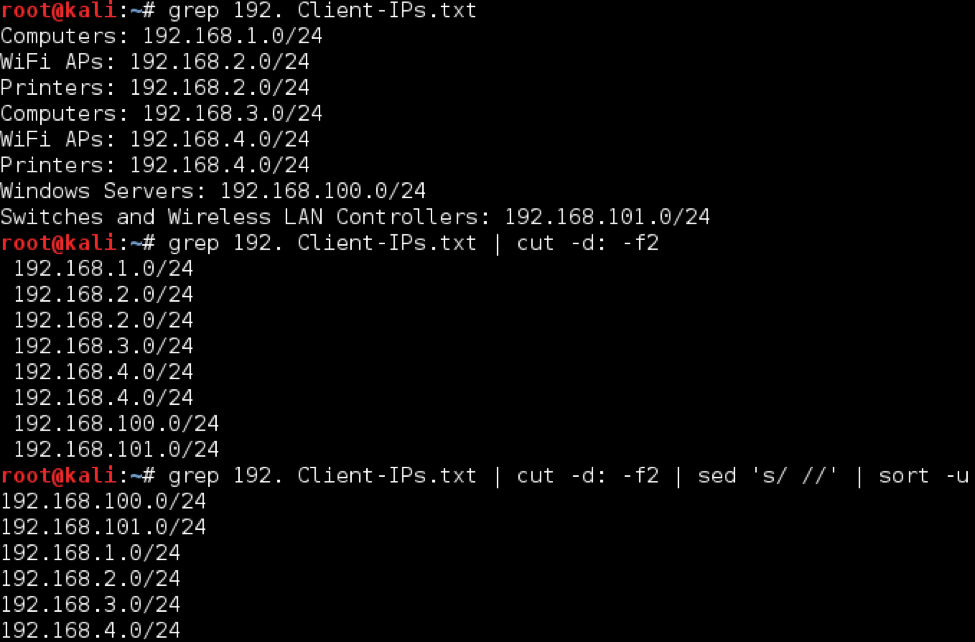
The grep command returns only lines containing “192.” - which are the ones with IP addresses. In the second command, cut will split each line returned by grep on every instance of a colon, returning the second field. We cannot use a space as the delimiter due to the inconsistent number of spaces prior to the IP range. Next, we use sed to strip the leading space. The final command sorts the IP address ranges and only returns unique entries, with the -u flag. Note that sort doesn’t intelligently sort IP address ranges if the list is complex, to do that you will need a different tool - such as awk.
We can accomplish the same results using only awk, but let’s imagine the list was less neat. What if the descriptions and IP address ranges were inconsistently separated using colons, hyphens, or spaces. We would need to split on the ‘192’ of the first IP address octet, rather than the colon.
A cool thing about awk’s print command is that you can mix fields with provided text. Since we’re splitting on ‘192’, we will need to replace that text like we did before except this time we can do it right inside of awk.
awk -F'192.' '/192./{print "192."$2}' client-ips.txt | sort -u

In this solution, the first command on the pipeline sets the field separator to be “192.”, the beginning of each IP address in the provided list, and searches for lines containing the pattern “192.” It is worth noting the advantage over the cut tool that multi-character delimiters provides. The command then prints out “192.”, which was lost due to being the separator, with the remainder of the line following, represented by the $2 variable. The final command sorts the IP address ranges and only returns unique entries, with the -u flag.
Parsing gnmap Files
In this example we want to parse live hosts out of a greppable nmap output file, also known as gnmap. Here is a sample of the output structure from scanning a single host:
# Nmap 6.47 scan initiated Fri Jul 22 00:58:58 2016 as: nmap -oG gnamp 192.168.55.212
Host: 192.168.55.212 ()	Status: Up
Host: 192.168.55.212 ()	Ports: 135/open/tcp//msrpc///, 139/open/tcp//netbios-ssn///, 445/open/tcp//microsoft-ds///, 49152/open/tcp//unknown///, 49153/open/tcp//unknown///, 49154/open/tcp//unknown///, 49156/open/tcp//unknown///, 49157/open/tcp//unknown///, 49158/open/tcp//unknown///	Ignored State: closed (991)
# Nmap done at Fri Jul 22 00:59:00 2016 -- 1 IP address (1 host up) scanned in 2.33 seconds
To extract live hosts with grep and cut, we could use the following command:
grep “Status: Up” nmap-scan.gnmap | cut -d’ ‘ -f2 | sort -u > livehosts.txt

As was the case before, we use grep to return any lines containing “Status: Up”, return the second field on those lines (the IP) with cut, make the list unique with sort -u, and use the single redirection symbol (>) to output the results to the file livehosts.txt. We now have a list of all hosts nmap determined as live.
To use awk, we use the following syntax:
awk '/Status\: Up/{print $2}' nmap-scan.gnmap | sort -u > live-hosts.txt

Notice the escaped colon in pattern matching section of the command.
Summary
In our opinion, parsing is an invaluable skillset for a penetration tester or red teamer. Often times, tests require analysis of massive amounts of data, and having the right information at the right time can be the difference between achieving the test objective and failure. In Bash, grep, cut, awk, and sed are the go-to parsing tools that can complete complex tasks with relatively little time spent creating the command, once you know the syntax. In this post we covered the basics of the Bash pipeline, introduced tool usage, and provided some real world examples. In future posts we will cover some more advanced parsing topics, such as regular expressions, parsing XML with Python, and Windows command line parsing. We welcome any comments about tips or tricks we may have missed that you use!
This post was co-written by Jeff Dimmock (@bluscreenofjeff) and Andrew Luke (@sw4mp_f0x).
Please check out Andrew Luke’s blog at https://pentestarmoury.com.
Parsing for Pentesters Posts
- Finding Diamonds in the Rough- Parsing for Pentesters
- Black Magic Parsing with Regular Expressions- Parsing for Pentesters