As pentesters and red teamers, we have lots of commands floating around in our head. As much as the 1337 profess to hate GUIs, they sure do make testing a lot easier. Cobalt Strike provides testers a lot of power with an easy-to-use interface. Aggressor Script offers a wealth of extensibility options to expand Cobalt Strike’s built-in functions, but building out a custom GUI is a bit more difficult.
Intro
Cobalt Strike’s Aggressor Script is built upon Raphael Mudge’s Sleep language. As Raphael says, “Sleep is a Java-based scripting language heavily inspired by Perl,” and it includes the ability to create and access Java objects while still being an interpreted script. This means we can use a Java IDE with a window builder, such as Eclipse, to make a GUI to control our Aggressor Script. This post will cover setting up Eclipse’s Java Swing window builder, porting the code to be Sleep compatible, hooking Sleep into the GUI’s elements, and some overall script design considerations. If you aren’t familiar with Java Swing or Eclipse, you will want to read through some of the documentation or watch a few crash course videos before working through a script.
For demonstration in this post, we will make a basic sleep timer script to change our Beacons’ sleep interval during certain hours (such as overnight during a red team assessment). The script source is available here on my GitHub. It’s heavily-commented to supplement what’s covered in the post. If you have questions as you go through it, hit me up on Twitter.
Before I go on, I want to thank Will Schroeder and Raphael Mudge for their help on this topic. I use Will’s veil-evasion Cortana script constantly when making scripts with GUIs - I recommend checking it out. Raphael’s documentation on Sleep and Aggressor is thorough and provides enough information to be able to work through questions I have.
Setting Up Eclipse
To set up Eclipse on a Debian-based host, we first install Eclipse:
sudo apt-get update && apt-get install eclipse
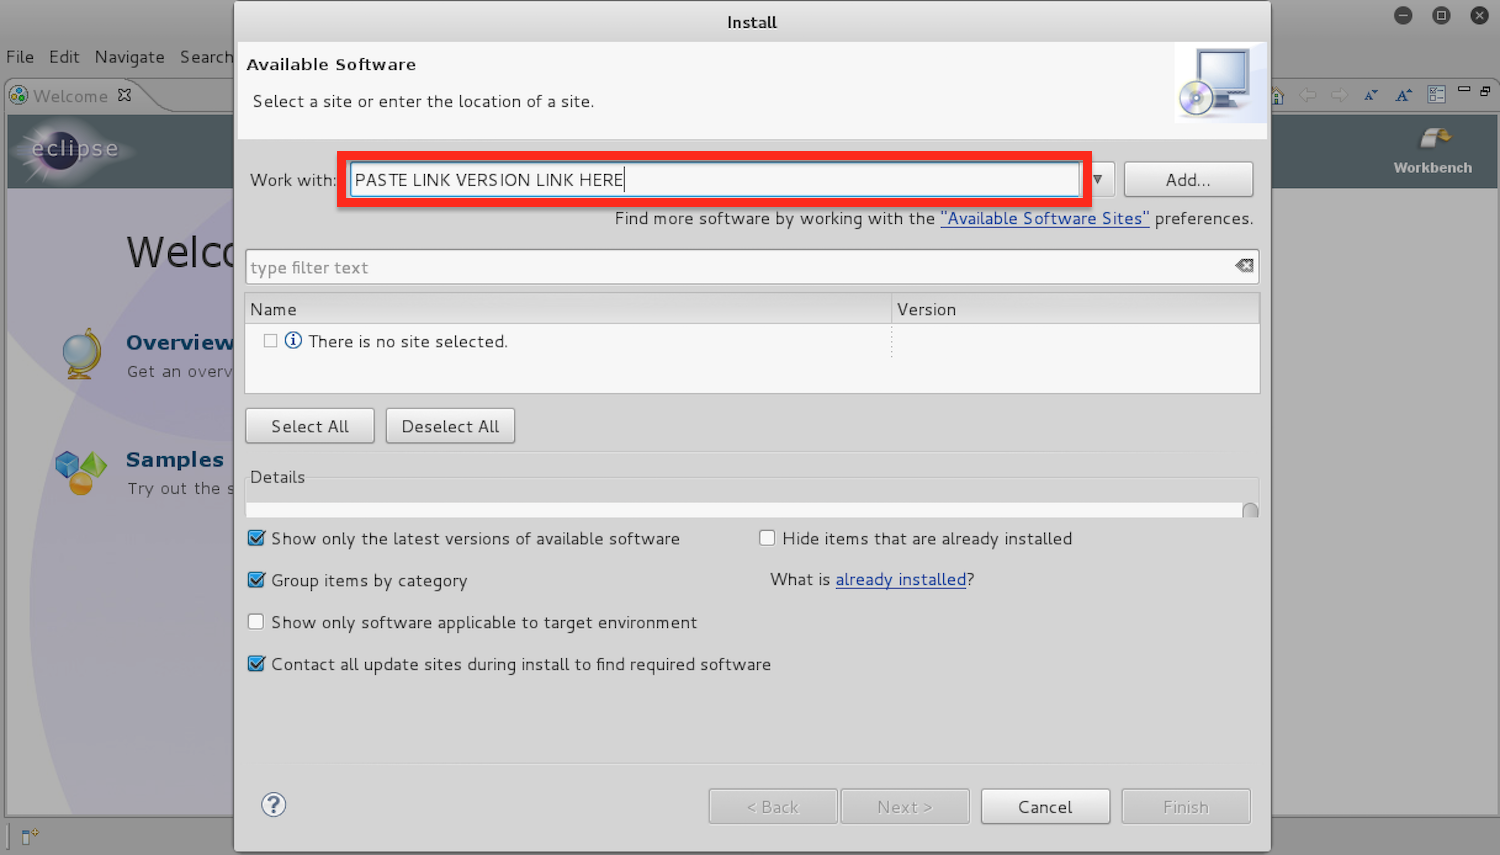
Next, we need to install the window builder add-ons. Open Eclipse, and under Help -> Install New Software... we need to paste the URL of the window builder package to install. Navigate to http://www.eclipse.org/windowbuilder/download.php, copy the ‘Update Site’ link that matches your version of Eclipse, and paste the URL into the ‘Work With’ field as shown below:
Click Next and select the Swing, SWT Designer, and Core packages. Follow the default prompts to complete the install.
Building the GUI
Now is the fun part: designing the GUI. At this phase, we need to figure out what the GUI will need to control, a general idea of the script’s function, and how we want everything to be laid out.
The end-result I wanted to accomplish by making this script was to have an easy way to have Beacons be configured to automatically sleep for longer periods of time overnight, but to reset to shorter callback intervals in time for me to resume testing in the morning. To make the sleep timer fulfill my requirements, there’s a few components we’ll need:
- a field to enter the sleep interval with optional jitter
- fields to enter the start and end of when the interval/jitter should be applied
- a checkbox to optionally reapply the sleep interval every 60s, in case new Beacons come in during the sleep time
- a checkbox to enable the sleep timer (so I don’t need to unload the timer when I don’t want it active)
- buttons to save the settings and cancel changes made
With a rough plan in mind for what we want, we move on to building the window. In Eclipse, create a new window builder file with: File -> New Project -> WindowBuilder -> SWT Designer -> SWT/JFace Java Project.
Click the arrow next to Create New Visual Classes (in the top-left, under Edit) and select Swing - > JFrame. Choose a name for the window and click Finish. Once the window file is created, select Design in the bottom-left portion of the screen. You’ll be presented with a WYSIWYG window builder. This is what we’ll use to create our GUI.
To minimize the amount of Java Swing to Sleep conversion we need to do in the next step, try to use the Grid and Flow layouts. The Java Swing layouts are unintuitive at first, but here’s how I set up the layout:
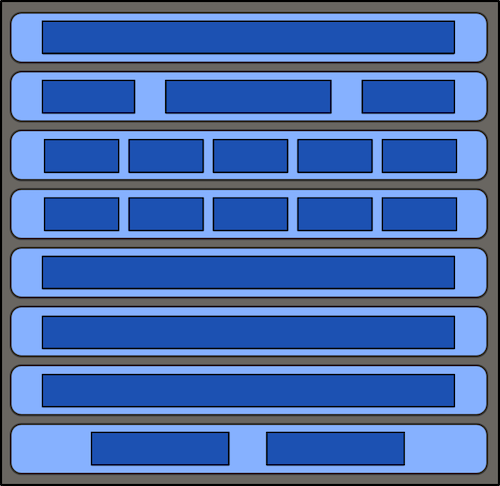
In the diagram above, the gray box represents the parent JFrame configured with the Grid layout that consists of one column and eight rows. Inside each of the eight rows, we place a JPanel object configured with Flow layout (light blue in the diagram). Finally, we place the components we want displayed in each row in the corresponding JPanel (dark blue in the diagram). This may seem confusing, but it is much easier to do the extra steps here than try to convert a GridBag layout to Sleep objects.
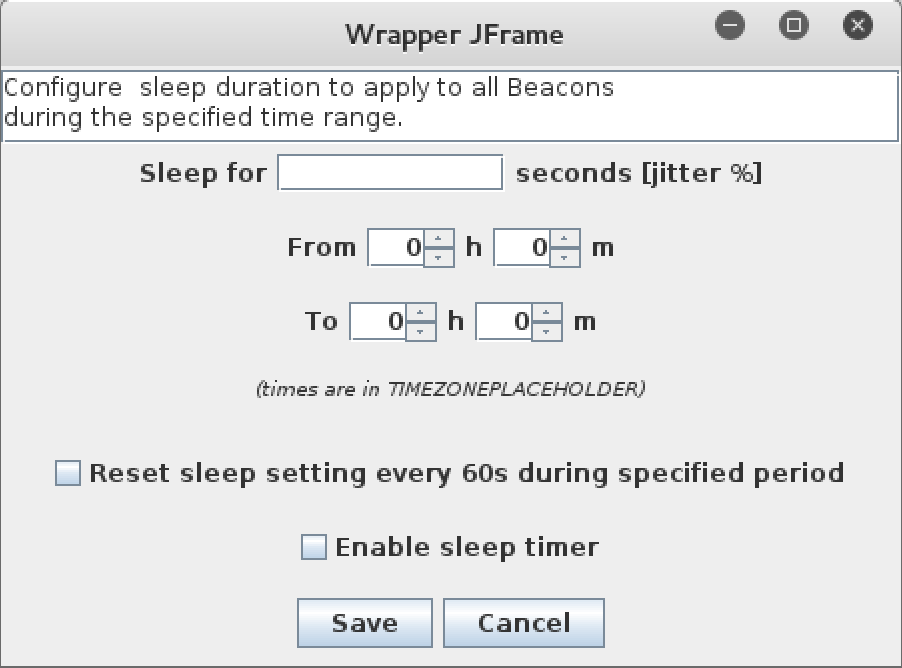
After laying out the components, we have our GUI:
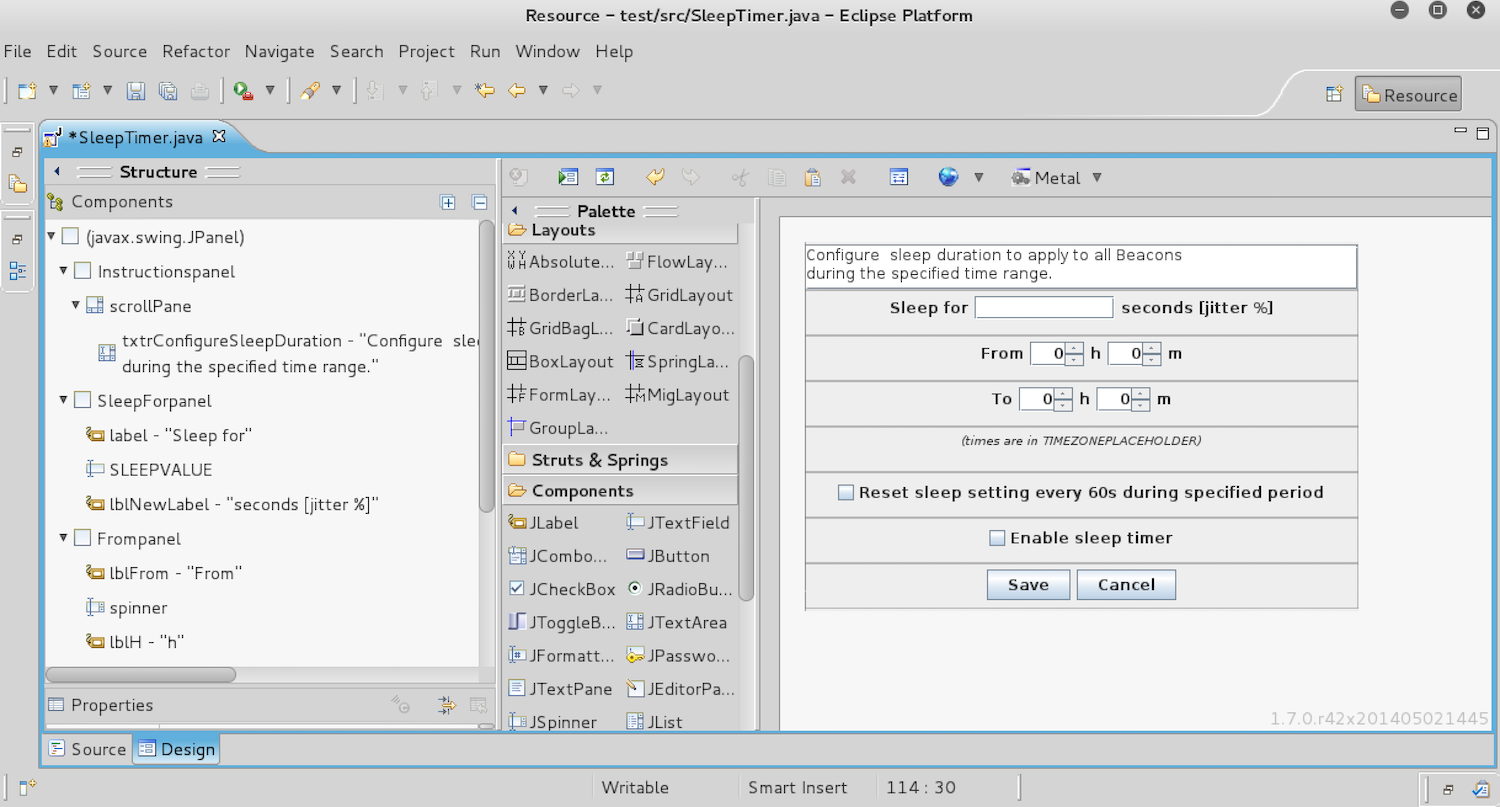
Click on the Source tab in the lower-left toolbar and save the Java Swing source code to a cna file. This is the code we will convert to make it Sleep compatible.
Note: If you get Eclipse errors when you add a component, try clicking ‘Reparse’ a few times.
Make the Source Sleep Compatible
We will need to prepare the raw Java Swing code a bit before we start the conversion process. First, add the following helper code to the bottom of the script:
# helper, from armitage/scripts/gui.sl
sub dialog {
	local('$dialog');
		$dialog = [new JDialog: $__frame__, $1];
		[$dialog setSize: $2, $3];
		[$dialog setLayout: [new BorderLayout]];
		[$dialog setLocationRelativeTo: $__frame__];
	return $dialog;
}
This snippet is from the open source code of Armitage (Cobalt Strike’s predecessor); specifically, this script. The code will create the dialog box where we will house the JFrame we made in Eclipse. (Another shoutout to Will for pointing me to this!)
Next, encapsulate all of the raw Java Swing code in a function and call the function when the script loads:
sub SleepingHoursConfigPopup {
	$dialog = dialog("Sleeping Hours Settings", 500, 350);
	---JAVA SWING CODE GOES HERE---
}
SleepingHoursConfigPopup();
Now we’re ready to make the code Sleep compatible. I highly recommend reading all of Section 7 - Java Objects of the Sleep documentation before going forward. As the documentation says, the syntax for creating or calling Java objects is:
[target message: argument, argument, ...]
So we will need to turn lines from
Instructionspanel.setLayout(new GridLayout(0, 1, 0, 0));
to
[$Instructionspanel setLayout: [new GridLayout: 0, 1, 0, 0]];
Notice that the attributes (new GridLayout) can be a second instantiated object.
Here’s a comparison of the first few lines of the raw Java Swing code and our Sleep compatible code.
Java code:
public class SleepTimer extends JPanel {
	private JTextField SLEEPVALUE;

	/**
	 * Create the panel.
	 */
	public SleepTimer() {
		setLayout(new GridLayout(8, 1, 0, 0));

		JPanel Instructionspanel = new JPanel();
		add(Instructionspanel);
		Instructionspanel.setLayout(new GridLayout(0, 1, 0, 0));

		JScrollPane scrollPane = new JScrollPane();
		Instructionspanel.add(scrollPane);

		JTextArea txtrConfigureSleepDuration = new JTextArea();
		txtrConfigureSleepDuration.setText("Configure sleep duration to apply to all Beacons  \nduring the specified time range.");
		scrollPane.setViewportView(txtrConfigureSleepDuration);

		JPanel SleepForpanel = new JPanel();
		add(SleepForpanel);
		SleepForpanel.setLayout(new FlowLayout(FlowLayout.CENTER, 5, 5));

		JLabel label = new JLabel("Sleep for");
		SleepForpanel.add(label);

		SLEEPVALUE = new JTextField();
		SleepForpanel.add(SLEEPVALUE);
		SLEEPVALUE.setColumns(10);

		JLabel lblNewLabel = new JLabel("seconds [jitter %]");
		SleepForpanel.add(lblNewLabel);
Sleep compatible:
	$containerPane = [new JPanel];
		[$containerPane setLayout: [new GridLayout: 8, 1, 0, 0]];

		$Instructionspanel = [new JPanel];
		[$Instructionspanel setLayout: [new GridLayout: 0, 1, 0, 0]];

			$scrollPane = [new JScrollPane];
			[$Instructionspanel add: $scrollPane];

			$txtrConfigureSleepDuration = [new JTextArea];
			[$txtrConfigureSleepDuration setText: "Configure sleep duration to apply to all Beacons  \nduring the specified time range."];
			[$txtrConfigureSleepDuration setEditable: false];
			[$scrollPane setViewportView: $txtrConfigureSleepDuration];
		[$containerPane add: $Instructionspanel];

		$SleepForpanel = [new JPanel];
		[$SleepForpanel setLayout: [new FlowLayout: [FlowLayout CENTER], 5, 5]];

			$label = [new JLabel: "Sleep for"];
			[$SleepForpanel add: $label];
		[$containerPane add: $SleepForpanel];
Comparing the two code samples should reveal the pattern of how to convert the code. We follow a pattern of defining Sleep scalars as instantiated Java Objects, modifying object attributes, and adding new objects on top of the underlying ones. We end up coding the GUI similar to how we created it in Eclipse, starting at the parent object and working our way down to the components. Indentation isn’t required for Sleep to be interpreted correctly, but it makes it easier to read.
The conversion process takes some trial and error, but ultimately we’re just changing syntaxes - lots of period and ellipses replacement.
Be sure to test the code in a Cobalt Strike teamserver to make sure it renders properly and without error.
Hooking GUI Elements with Sleep
Now that we have the GUI built, it’s time to make it control our script. There’s two main functions you’re going to need the GUI to fulfill: making things happen (buttons) and accepting input/displaying output (TextFields, Spinners, CheckBoxes, etc).
Buttons
Configuring buttons to perform actions is as simple as adding an action listener and triggering a lambda function with the desired actions enclosed.
[$btnSave addActionListener: lambda({
	---actions go here---
}
The code within the lambda function is just like writing a standard Aggressor Script.
Closing Windows
To close a window (or component) in Sleep, use the setVisible method. setVisible expects an integer of 1 (visible) or 0 (not visible). To close the main dialog window, for example, the syntax looks like this:
[$dialog setVisible: 0];
TextFields
Specific object methods for retrieving or setting values vary slightly across each component, but the documentation for each is readily available.
To set a value on a TextField, use the setText method:
[$myTextField setText: "Hello World!"];
To retrieve the value, use the getText method:
[$myTextField getText];
Spinners
Spinners are similar, except the methods are called setValue and getValue. An important note is that spinners require integers, not strings, be set with setValue. To set the value in your script, use the following syntax:
[$spinner setValue: [new Integer: $stringvalue]];
Also note that the provided integer must be within the accepted value range you set up with the spinner object.
CheckBoxes
The checkbox has two states: selected (1) or not selected (0). You can set state with setSelected and retrieve the state with isSelected. The methods expect or return the integer value of 1 or 0.
Script Design Considerations
After creating the GUI, converting the raw Java Swing code to be compatible with Sleep, and hooking the GUI components, all that’s left is coding the rest of the script. There are a few bits of functionality or design choices I wanted to highlight here that will hopefully be helpful as you write your scripts:
- Save settings to a hashtable. It’s a lot cleaner than trying to use a bunch of scalars or arrays.
- Build error checking into the save functionality. If any provided input can potentially cause logic problems or result in incorrect commands being issued on hosts, add error checks to prevent those issues.
- Notify other users of important actions or setting changes in the Cobalt Strike Event Log, if other testers or hosts may be impacted. Use elog to do this.
- Use binput anytime a command is run on a Beacon session. binput writes executed commands to the logs, which can be invaluable after an assessment. Make sure the binput command accurately matches the executed commands in your scripts.
- Always provide a cancel or close button for a dialog. It’s a lot easier to remember this up front than to have to go back and squeeze it in later.
Demo
Here’s a demo of the final script:
Summary
Pentesters and red teamers are often required to juggle a lot of hosts and information during a test. During complicated testing, a GUI makes the world of difference- simplifying the process and allowing complex actions to be taken quickly. Since Aggressor Script is built on the Sleep language, scripts can incorporate Java Swing GUIs to interact with Cobalt Strike and Aggressor Script. Eclipse provides an WYSIWYG window builder that can be converted to work with Sleep. Using the steps outlined in this post, you can add a custom GUI for your Aggressor Scripts with relatively little work.
If you get stuck while going through this post or working on your own script, feel free to hit me up on Twitter to ask for help.